Do you want to learn how to quickly and easily cover up certain details in a photo directly on your iPhone? This article is exactly what you need! There are two free apps that can help you conceal any kind of sensitive information from prying eyes — be it house or ID numbers, people’s faces, license plates, login details in screenshots or documents, etc. The detailed instructions provided in this article will teach you how to use both of these user-friendly apps.
One of these aforementioned apps is the built-in Markup App. It can easily be accessed via the Photos gallery; you’ll learn how to do that in just a moment. The second app is called Blur Face on Photo. You will need to download and install it, but it allows you to blur any part of a photo without additional costs.
Let’s see how exactly you can hide confidential information in your photos using these two apps. Then we’ll compare the results and analyze all the pros and cons.
How to Blur a Part of a Picture on iPhone Using Markup Tool
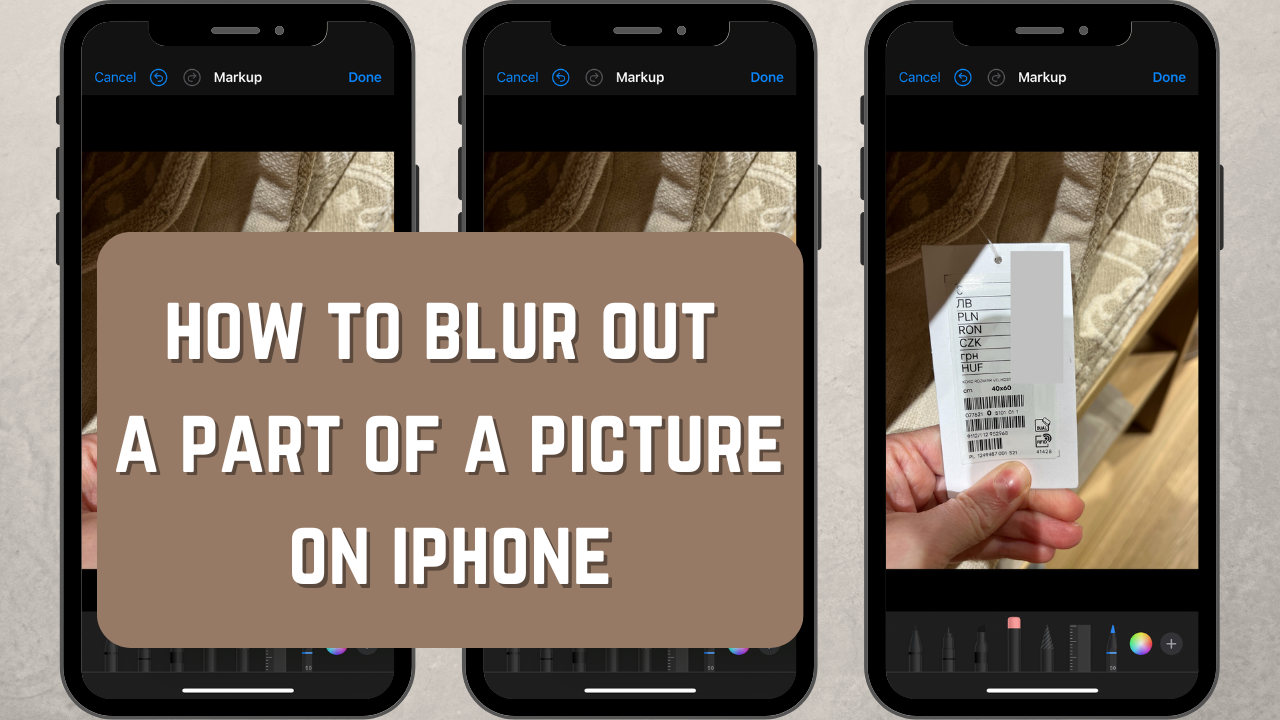
Before we begin there’s something that you need to know about this built-in app. It does allow you to conceal any part of an image. But this is achieved by covering the necessary part with something rather than blurring it. It’ll be enough for your confidential data to be indistinguishable and thus, well-protected. However, the hidden areas might look a bit obtrusive and not aesthetically pleasing.
The main advantage of this app is that it’s already on your smartphone. You don’t need to download or install it. And technically, it can blur a part of a picture on iPhone just in a slightly different way. It’s free of charge and right at your fingertips.
Let’s see what exactly you need to do:
- Open your picture or screenshot in the Photos App.
- Find the Edit button in the top right corner and tap on it.
- See the Pencil icon at the top? Tap on it to launch the Markup tool.
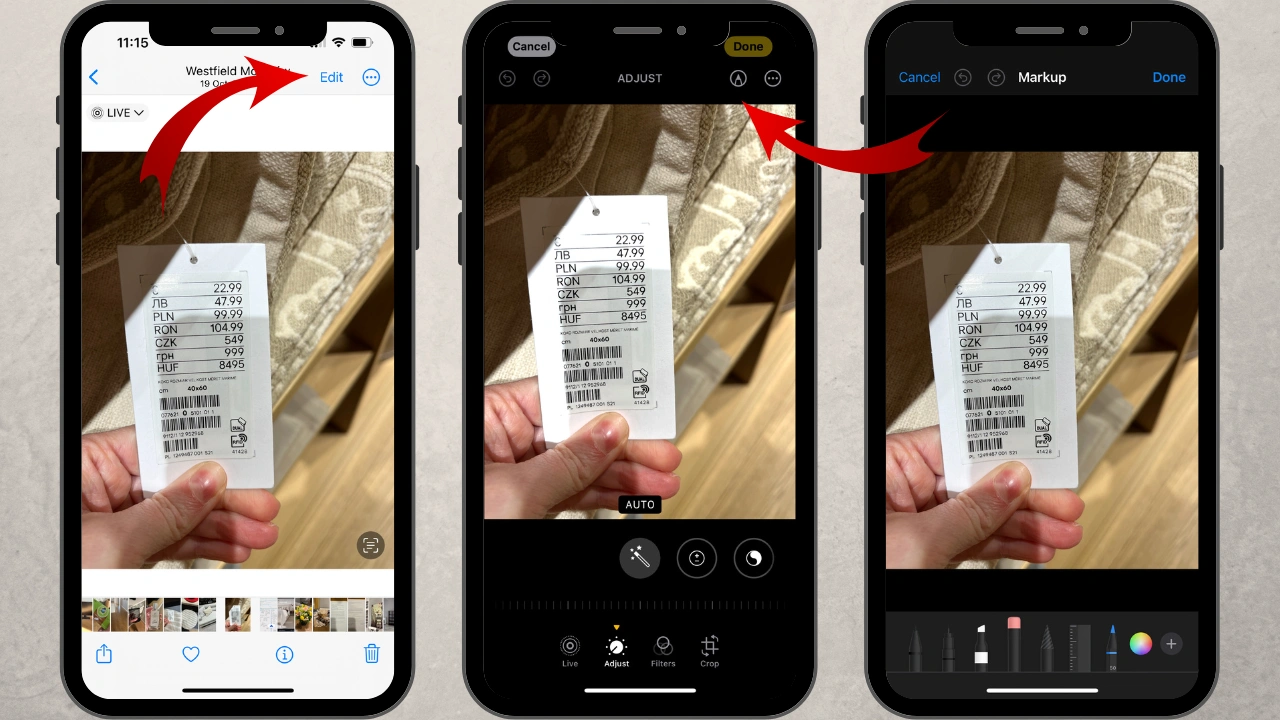
- Now you can start blurring a part of an image on iPhone. In fact, you can do this in two different ways:
Option #1: Select the Marker Tool
You will find it at the bottom of the iPhone screen. Using Marker tool you can paint over the necessary area with your finger. Make sure to pick the desired color before you begin.
Tip: if you need to completely hide an object in your photo, you should go for black or white.
Some dark colors can work, too. That’s because these colors will be opaque enough to make the object indistinguishable. Additionally, black, white or dark grey will fit into the image more seamlessly. This will allow you to fully hide a part of the iPhone image in one go. Please note that some other colors, especially lighter hues, might not have enough opacity. As a result, you might need to apply several strokes to achieve the right level of indistinguishability.
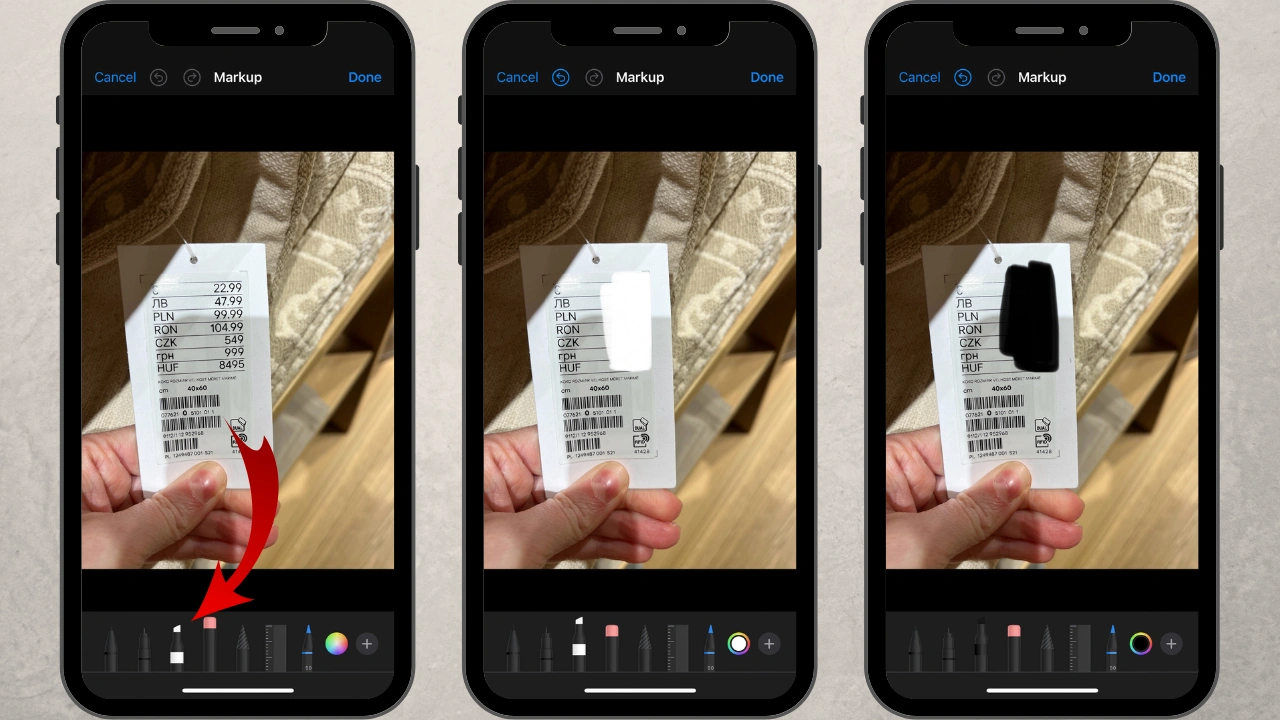
You can erase bits of the marker strokes with the eraser tool; it’s to the right of the marker. If you want to start over, use the Undo button. The downside of this method is that since you need to use your finger, you will get a somewhat messy result.
Option # 2: Use the Add Shape Feature
It can be accessed by clicking on the “+” icon. If you need to cover a line of text or a boxy object, opt for the rectangle. The circle is ideal for concealing a face. Unlike the previous method, the shape that you will create will have a sharp edge. This means that the hidden area will look quite tidy and neat.
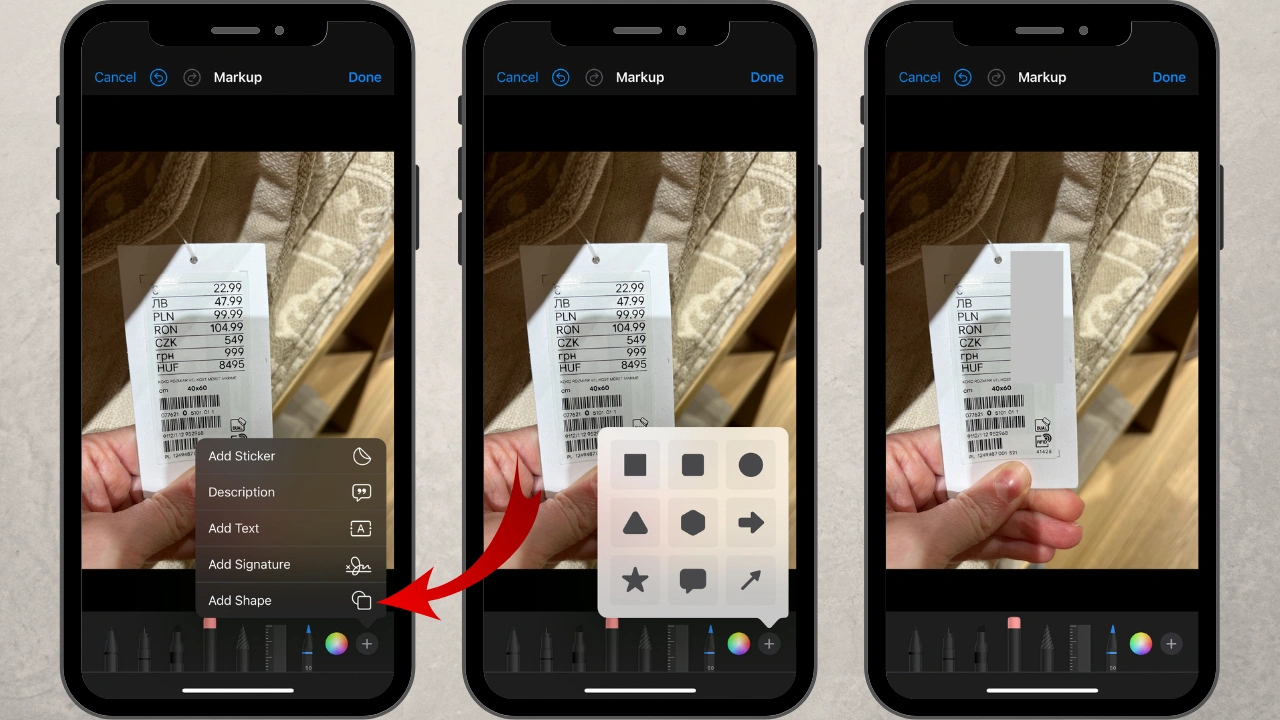
So, select the necessary shape and add it to your picture. You can easily adjust its size and position as well as tilt it using your finger. The shape will be filled with an opaque, solid color, no matter which hue you’ll choose.
If you want the concealed area to be more unobtrusive, you can either go for a neutral color or pick a color that’s already in your photo. For instance, if there’s lots of blue in your image, you should make your shape blue.
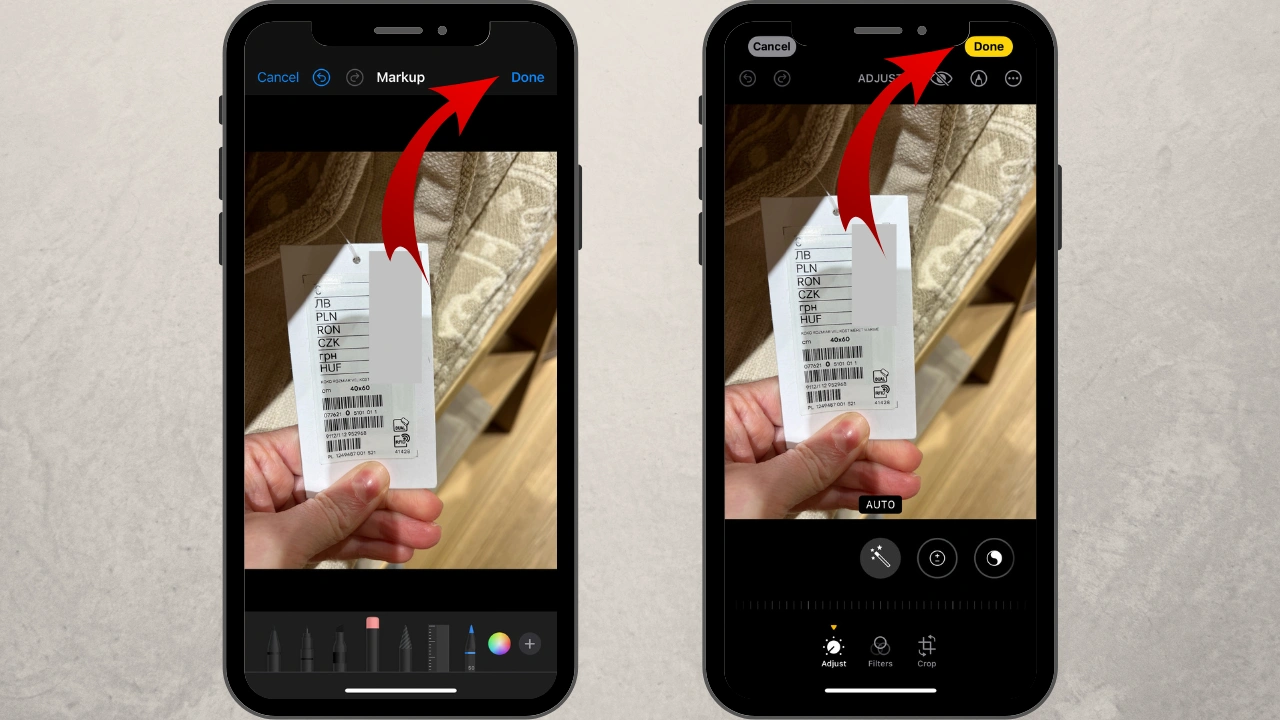
When you are satisfied with the result, click on the „Done” button twice: first to exit the Markup app, then to exit the editing section. Your edited photo will be saved to the gallery, replacing the original.
If you need to hide a part of a single photo or screenshot, the whole process shouldn’t take long. You can blur a part of a picture on your iPhone, then immediately send it to someone or share it online. All without worrying that your confidential information might get into the wrong hands.
If you need the concealed area to be unobtrusive and fit into your photo seamlessly, it might be a better idea to use the Add Shape feature and choose the most appropriate color. Try different colors and hues to see which one will fit into your image more organically. This feature also provides a more professional-looking result.
The Main Pros:
- This app is free.
- It’s already installed on your iPhone.
- It’s beginner-friendly and has a super simple interface.
The Main Cons:
- If you specifically want to blur a part of a picture on iPhone, this app isn’t for you. Here you can conceal a part of an image with a marker or by adding a shape.
- You can edit only one picture at a time, so processing multiple images will be time-consuming and, thus, inconvenient.
- You’ll need to do everything manually.
- The original photo will be overwritten in the Photos app.
How to Blur a Part of a Picture on iPhone Using a Third-Party App
If you actually want to add a blurring effect to your iPhone images, you should go for a third-party app that was designed specifically for this task. It’s called Blur Face on Photo and it’s available for free.
As you might have guessed, the main advantage of this app over the Markup Tool is that it can actually blur a part of a picture.
No marker tools. No shapes with solid colors. As a result, the blurred area will blend into your image seamlessly – it might actually take people a moment to realize that a part of your iPhone image is blurred.
But that’s not all! This app utilizes AI algorithms to identify faces and license plates in photos, then blur them automatically. Yep, this app will do some of the work for you. It’s possible to make some edits and add a blur manually, as well. Since you will get an actual blurring effect here, you won’t need to select a color or paint with your finger.
What’s more, this app is super-simple and perfect for users of all levels.
Here is how it works:
- Find the app in the App Store and install it on your iPhone.
- Open the app and select the images you need to blur. Here, you’ll be able to work with more than one photo.
- If your photos feature people or vehicles, their faces and license plates will be blurred as soon as the images are uploaded into the app. Are these the parts that you need to blur? Then you can tweak the blurred areas, if necessary. Use the Objects section to unselect faces or license plates that you don’t want to blur. Then move on to exporting.
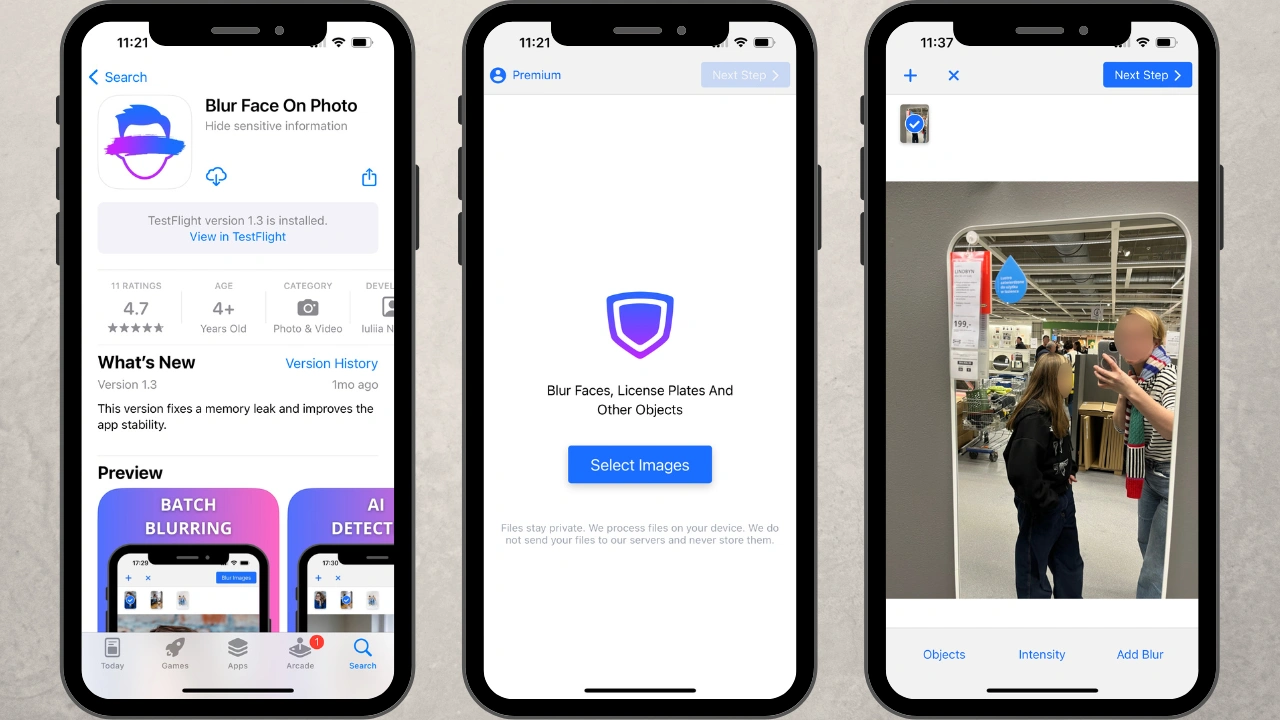
- If you need to blur a line of text, some numbers, or any other object, click on the Add Blur button. It works similarly to the Add Shape feature in the Markup Tool. In other words, a shape will appear on your image, but it won’t be filled with a solid color. It will be blurred.
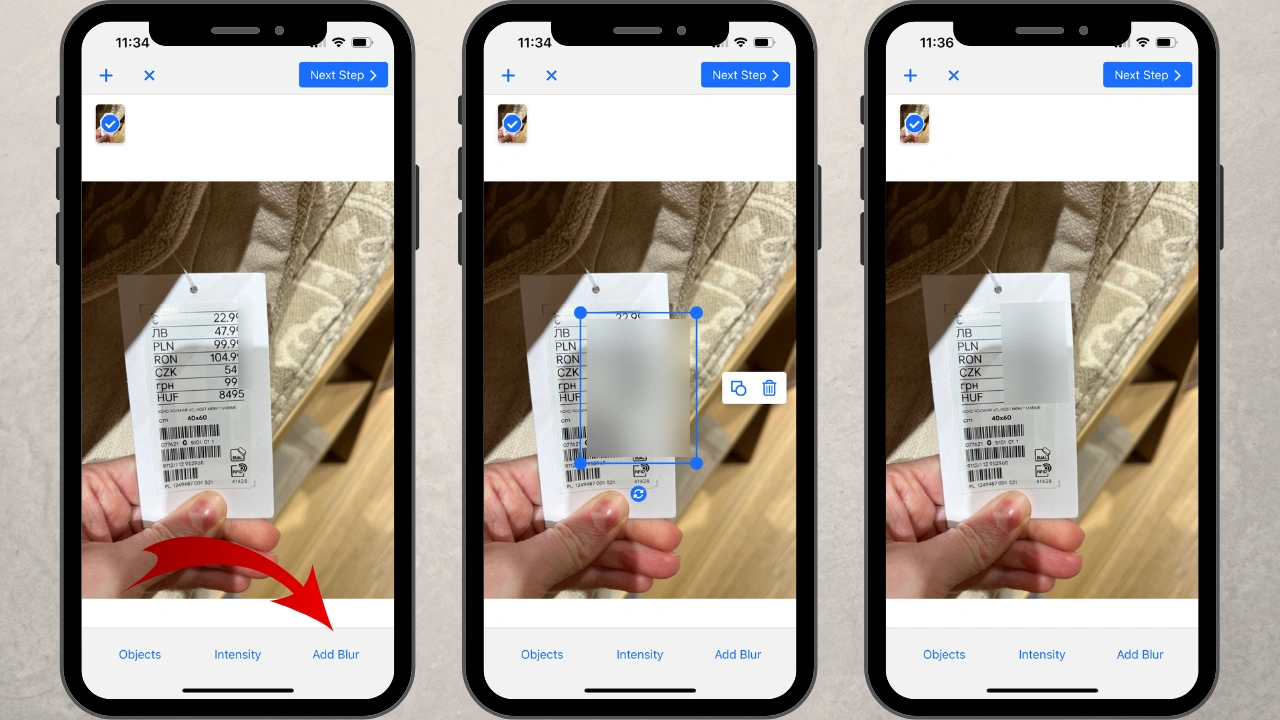 By default, it will be rectangular, but you can easily switch to a circle by clicking on the circle button. You can switch between a rectangular and a circle at any point of the editing process. Here, it’s also possible to adjust the size, angle of rotation, and position of the blurred area. Use the intensity slider to change the intensity of the blur.
 - To download your edited images go to Next Step > Blur Images. The pictures will be saved to the Photos gallery.
Using this app is just as easy as using the Markup Tool, except that here you can actually blur a part of a picture on iPhone as well as get professional-looking and aesthetically pleasing results.
The Main Pros:
- The app has no hidden costs.
- Here you will really be able to blur a part of an image on iPhone.
- It supports batch-processing, so you’ll be able to blur parts of multiple photos in one go.
- It automatically blurs faces and license plates which can really speed up your workflow.
- All the changes will be applied to copies. Nothing will happen to the originals.
The Main Cons:
- You need to download it to your iPhone.
- You need to watch an ad before exporting your blurred images in the free version of the app.
Summary
Blurring parts of a photo on your iPhone doesn’t have to be complicated or time-consuming. With the apps featured in this article, you can easily conceal sensitive information, whether it’s for privacy, security, or aesthetic reasons.
If you need to quickly edit a photo or two, then the Markup Tool will be perfect for this task. And it’s already on your iPhone! As you’ve already seen, it doesn’t actually offer the blurring effect. Instead, you’ll either paint over the necessary area or cover it with a solid colored shape. It can be great for occasional use because it’s incredibly simple and easily accessible. But this app does have some disadvantages: you’ll need to do all the editing manually, plus you’ll be able to process only one image at a time. Thus, the Markup app is not suitable for blurring parts of multiple images on a daily basis.
If you’re looking for something more efficient, then the Blur Face on Photo app would be perfect for you. It allows you to add an actual blur to images on iPhone. It also offers automatic detection of faces and license plates, which can really optimize your workflow if these are the objects that you blur often. On top of all that, unlike the Markup Tool, this app can work with batch of images, and it will apply all the changes to the automatically created copies. Your originals won’t be overwritten. Taking all this into account, it’s safe to say that if you need to blur pictures quite frequently, there’s no better app for the task than the Blur Face on Photo.
As with everything, both apps have their pros and cons. But only your needs and goals can determine which one will be the most useful for you. The Markup Tool is quite convenient and accessible, while the Blur Face on Photo offers some advanced capabilities and provides professional-looking results. If you really want to figure out which app will be the best for you, you should give both of them a try. But no matter which app you’ll end up choosing, you will definitely be able to hide and protect all the confidential information in your images.
More About Photo Editing on iPhone
How to Resize an Image on an iPhone
 Visual Watermark
 by
by 