Sharing any kind of confidential information online is very dangerous these days. It might get you into some serious trouble or cause a data breach at your work. Before sharing images online, make sure that they don’t contain anything that can be used against you. If there’s some sensitive data, you should hide them by adding a blur.
Therefore, you might need to blur a part of an image in Photoshop for personal or work-related reasons. Say, you need to post a photo of your coworkers on a social media account, but some of them aren’t comfortable with this. So, to respect their privacy, you decide to blur their faces.
Or maybe you want to share a photo of yourself in an airport holding your boarding pass. The text on the boarding pass is readable, so if you want to conceal your personal information and where you’re heading – you want your followers to guess! – you can blur it all out.
Here’s another example. You gave a try to nude photography and want to share your works online. But most popular social media platforms have some strict rules regarding nudity. For instance, you can get a shadow ban on Instagram for this kind of content. If you want to avoid this, it’s better to blur out some parts of a naked body. For instance, a woman’s breasts.
Blurring a part of an image is an aesthetically pleasing and unobtrusive way of hiding sensitive information. It’s not a complicated task to perform. In fact, it can be done in one of the most versatile and advanced software in the world – Adobe Photoshop. Don’t worry, you’ll be able to do this even if you are new to image editing.
This article features step-by-step instructions on how to blur a part of an image in Photoshop in three different ways. They produce slightly different results, yet all three are simple and rather quick. You will also learn about an easier way to add a blur to an image within just a couple of minutes.
Are you intrigued? Let’s get started!
How to Blur a Part of an Image in Photoshop with Blur Tool
Photoshop’s toolkit is HUGE. So, unsurprisingly, it includes a tool that can be used to blur any object in an image. Here’s what you need to do:
Select the Blur Tool in the toolkit by clicking on its icon.
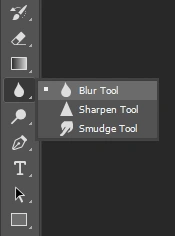
At the top, you will find the Options menu. Here, you will be able to switch to a different blending mode as well as choose the necessary strength of the blur.

The size of the stroke can be changed in the Options menu, as well. But a quicker way would be to use a shortcut: press the left or right bracket keys – “[” and “]”. The left bracket key reduces the size, while the right one increases it.
When you’re ready, paint over the object that you want to conceal in your image. If you want to get a more intense blur, paint over the object several times.
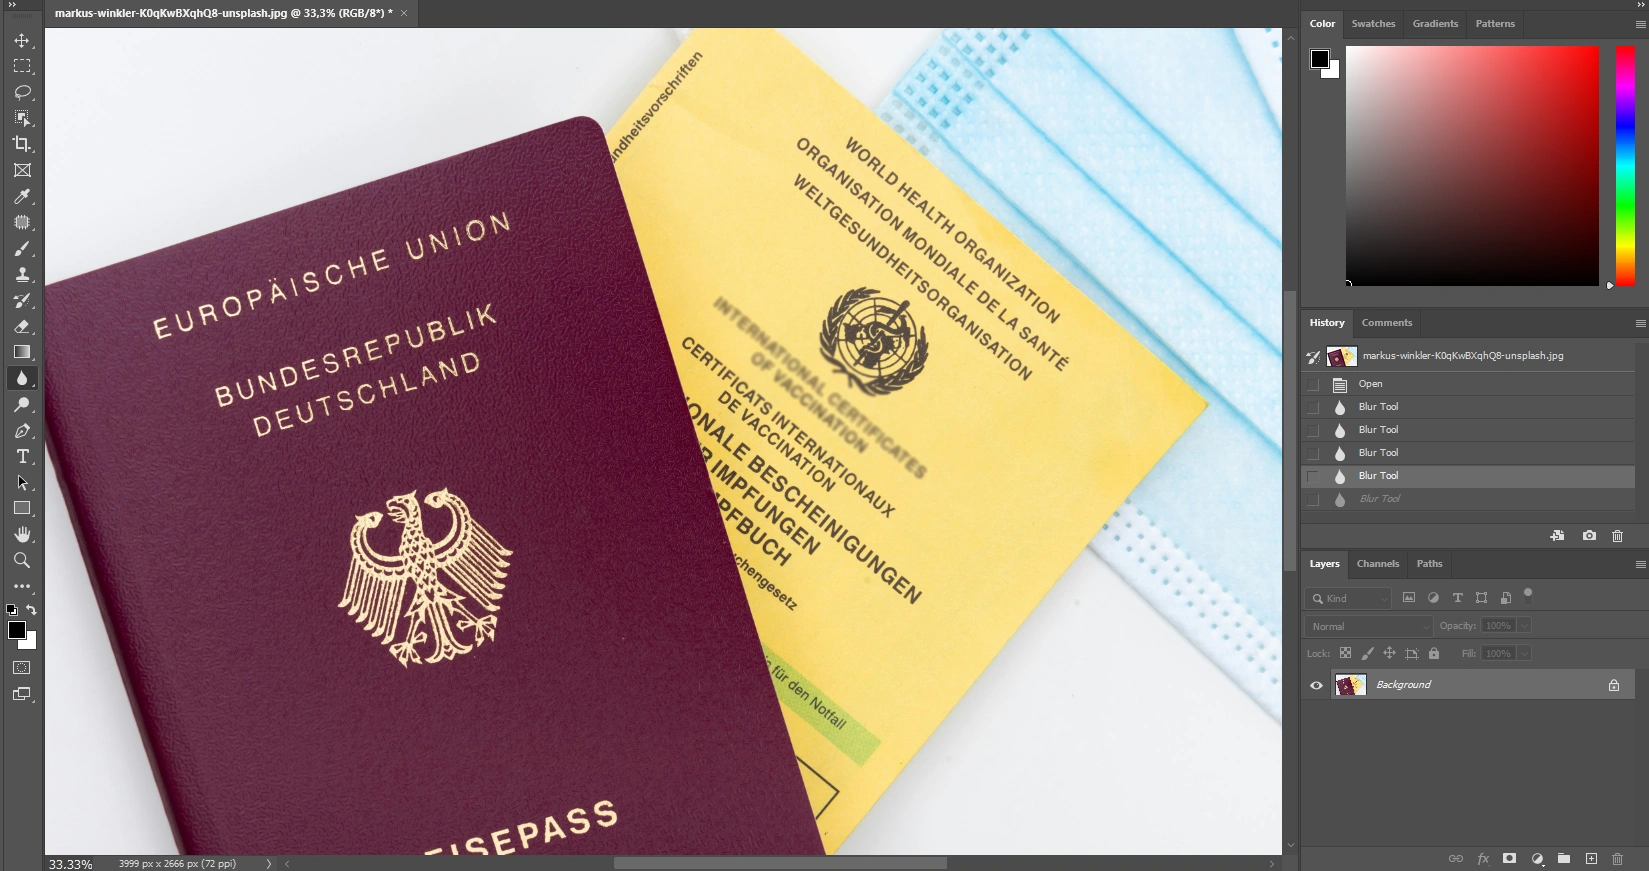
And that’s it! Pretty easy, huh?
Now, it’s been mentioned before that there are three ways to blur objects in Photoshop…and you’re probably thinking what’s the point of the other two options if this one is so easy. Right?
Well, the Blur tool has a drawback. You can set the strength to 100%. You can paint over the object several times; maybe even 10 or 20 times. The blur will still be quite mild. It won’t be enough to make an object unrecognizable or text unreadable.
Here’s the original and the blurred version:
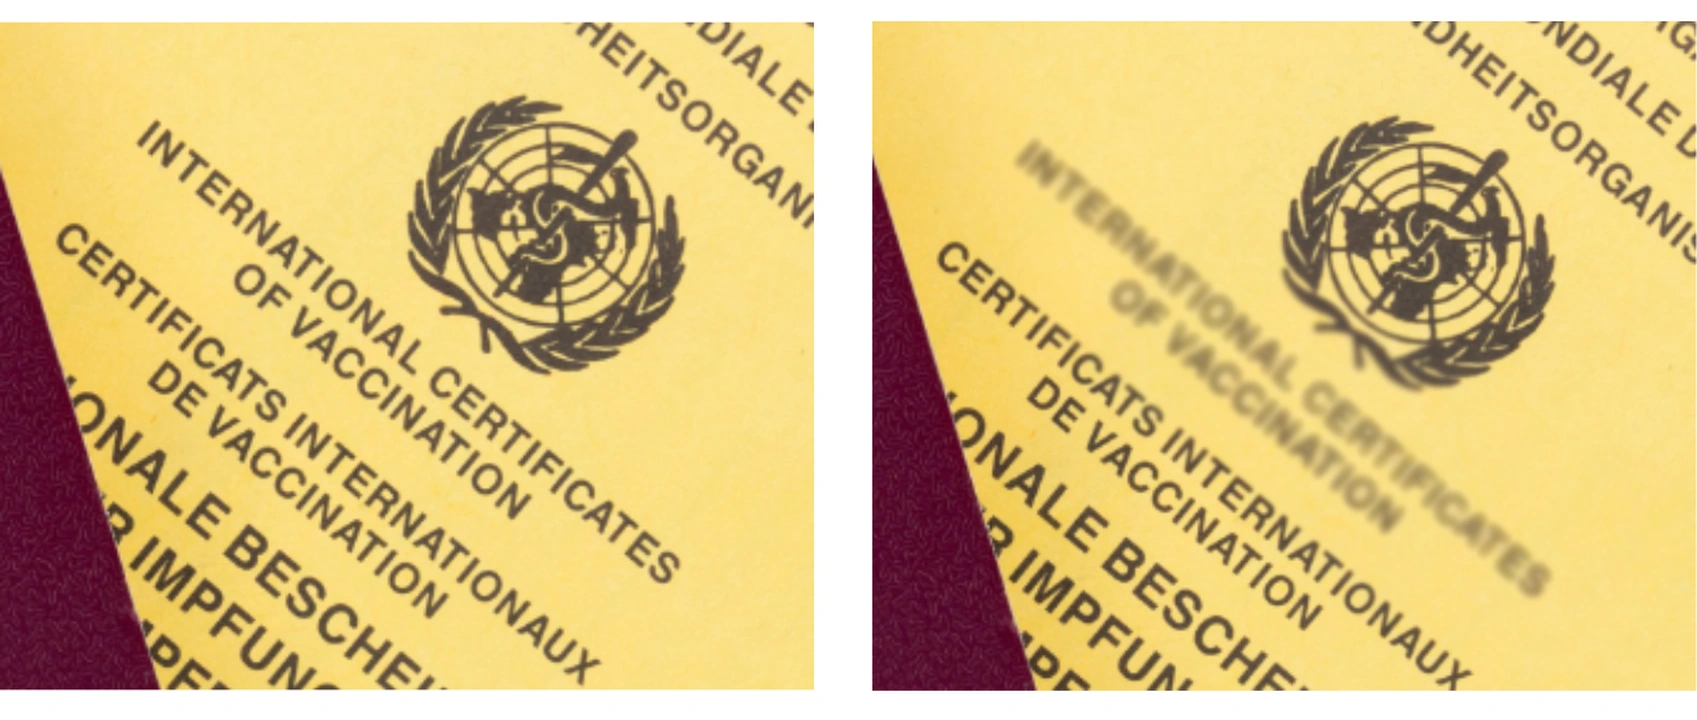
If you need to add a light blur to a part of an image, then the Blur Tool will be perfect for you.
However, if your goal is to really conceal something, keep reading.
How to Blur a Part of an Image in Photoshop with Marquee Tool
You will be able to control the intensity of the blur much better by using this method. It will require a bit more time than the previous option, but it’s just as easy. Follow these steps:
- Upload your image into Photoshop.
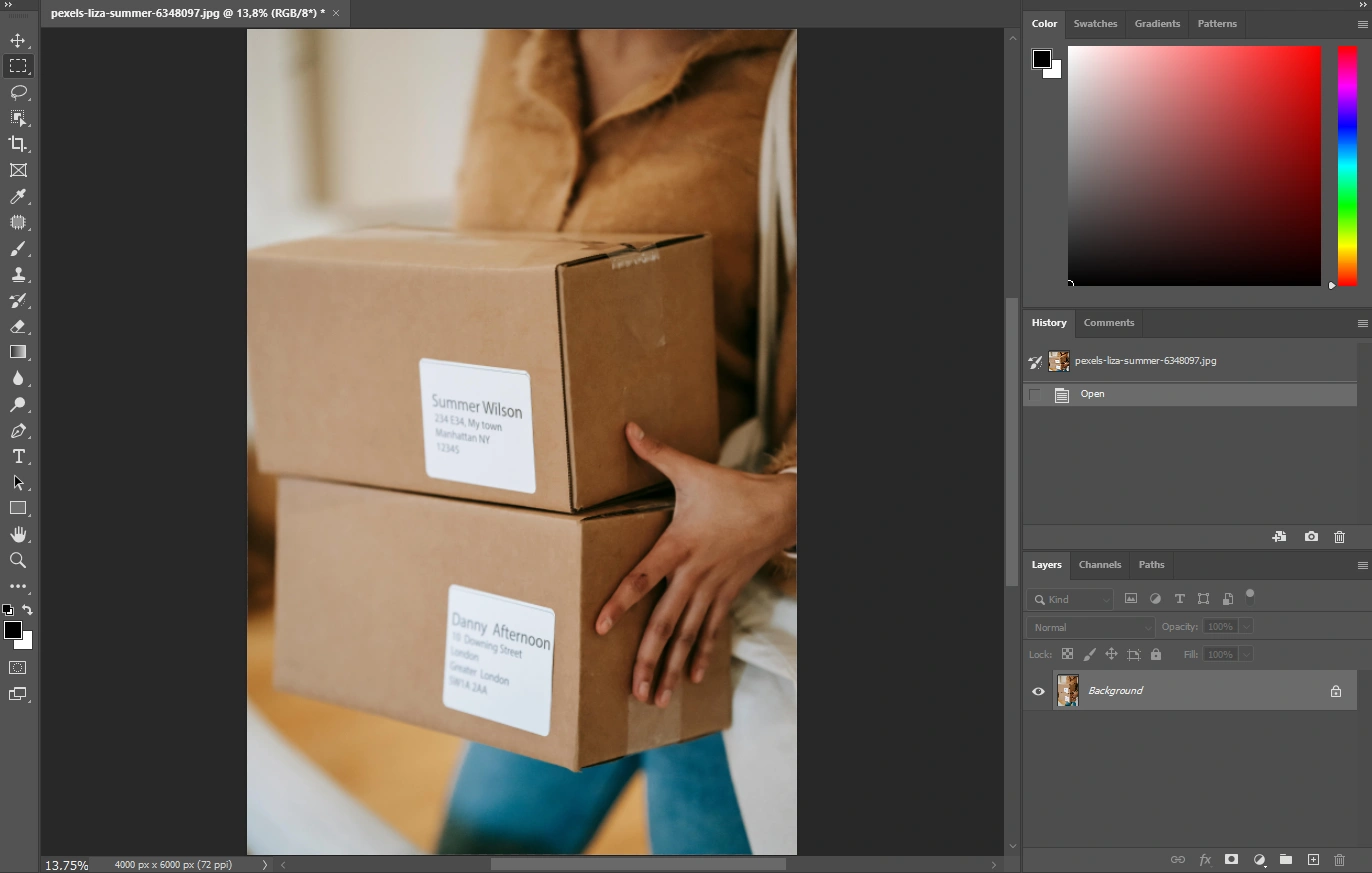
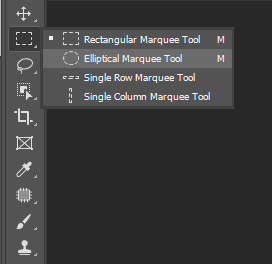
- Select the Marquee Tool by pressing “M” on the keyboard. Now, if you’ve never used this tool before, it will probably be rectangular. If the object that you need to blur is square or rectangular, you don’t need to change anything. But if you want to blur a face or any other oval or circular object, you can switch to an oval by right-clicking on the icon of the Marquee Tool, then selecting the “Elliptical Marquee Tool”.
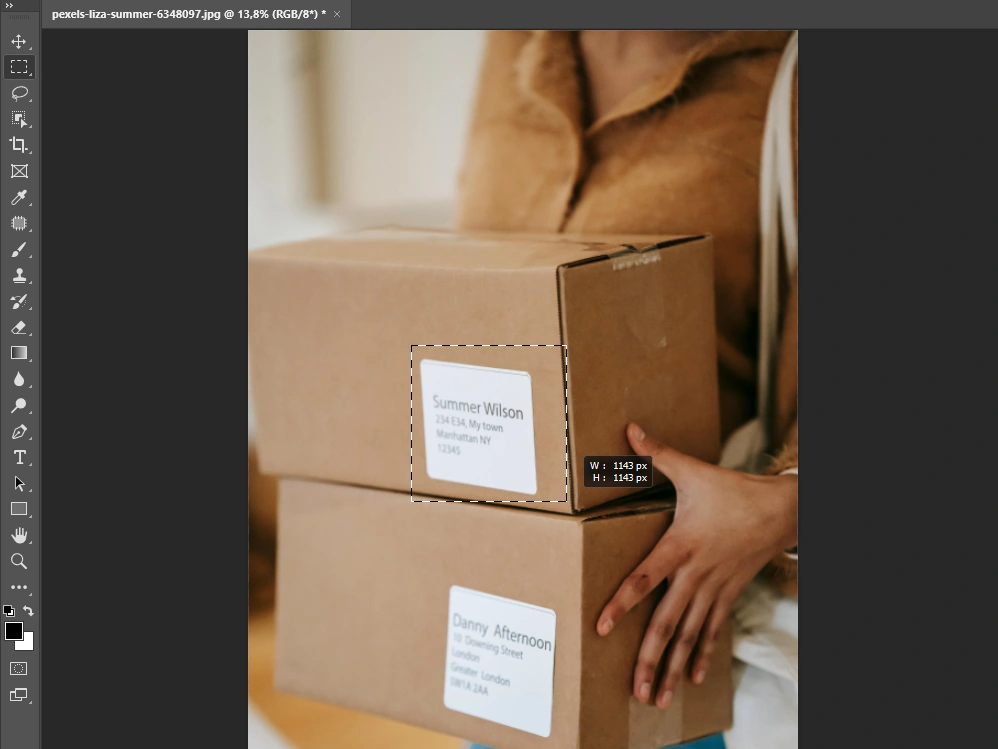
- With the cursor, draw the selection over the object that needs to be concealed. Hold SHIFT while drawing to get the perfect square or a perfect circle.
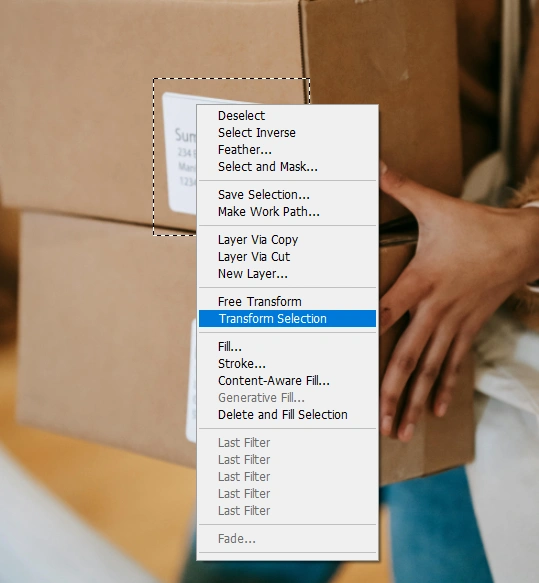
- Say, you want to make some adjustments to your newly created selection. Right-click inside it. In the drop-down menu select “Transform Selection”. Your selection will now have the blue borders.
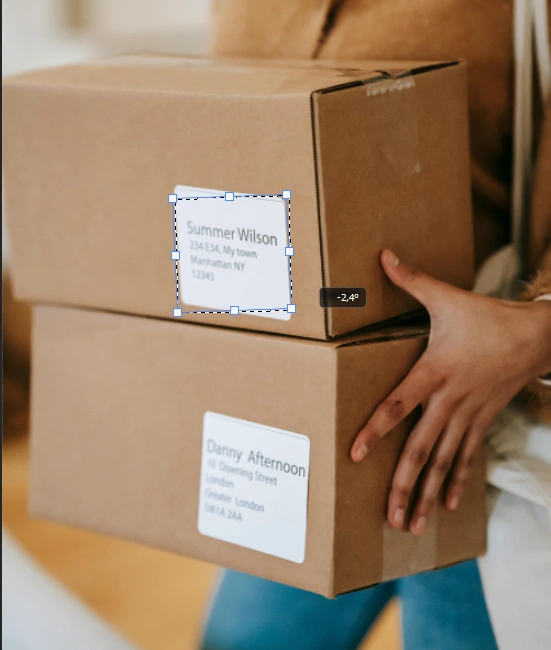
- Reposition and resize the selection with the cursor. It’s also possible to change its angle of rotation, which can be useful if you need to blur a tilted object. When you’re done, press “Enter”.
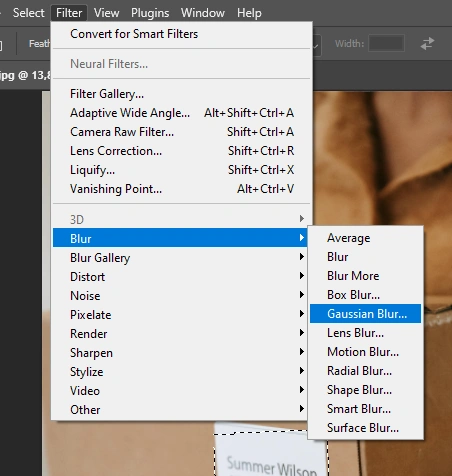
- It’s time to add a blur! Navigate to Filter > Blur > Gaussian Blur.
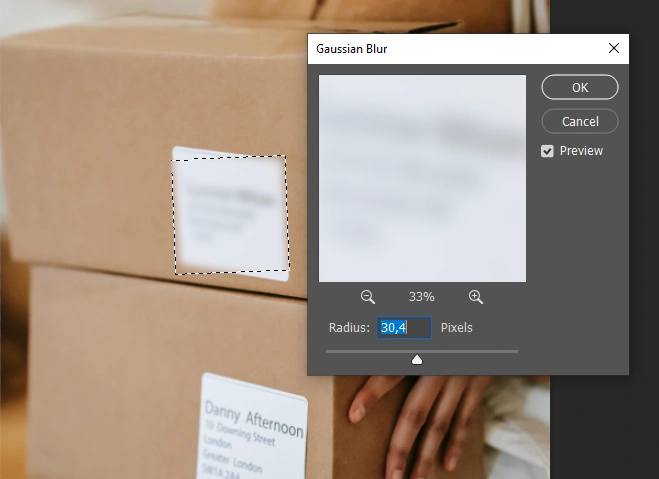
- In the Gaussian Blur settings, change the radius by entering the necessary number of pixels. Alternatively, you can simply toggle the slider until you’re happy with the intensity of the blur. There’s a preview, so you will be able to determine whether the blur is intense enough. To apply the changes, click “OK”.
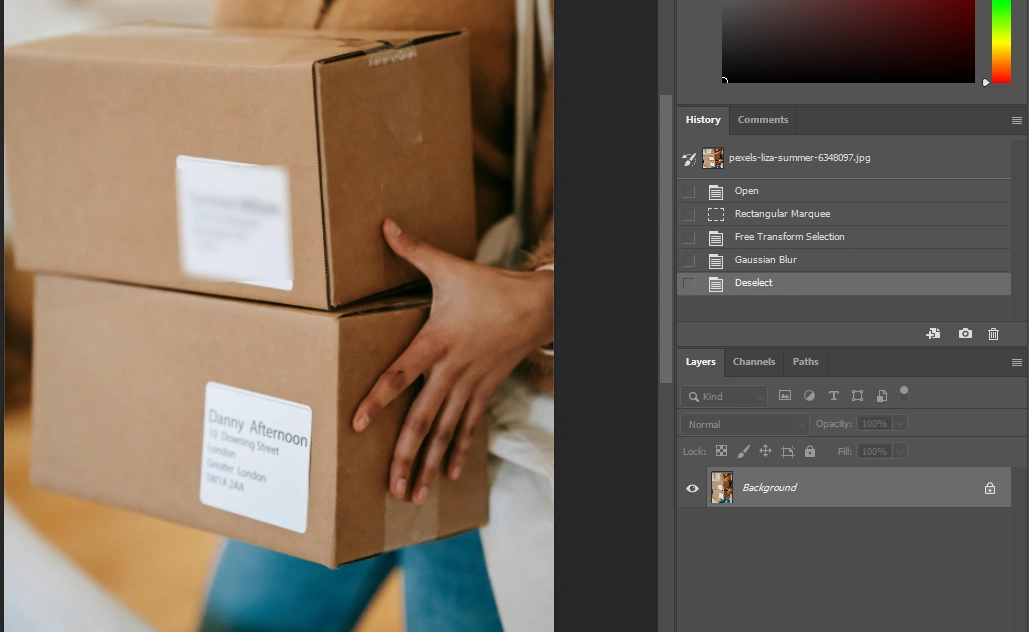
- Voila! A part of an image is blurred! To deselect, press CTRL + D or COMMAND + D. The selection won’t be active anymore.
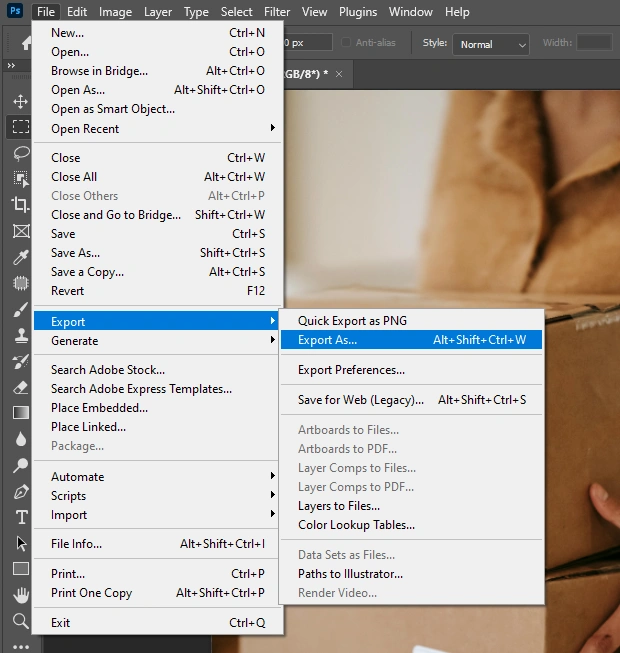
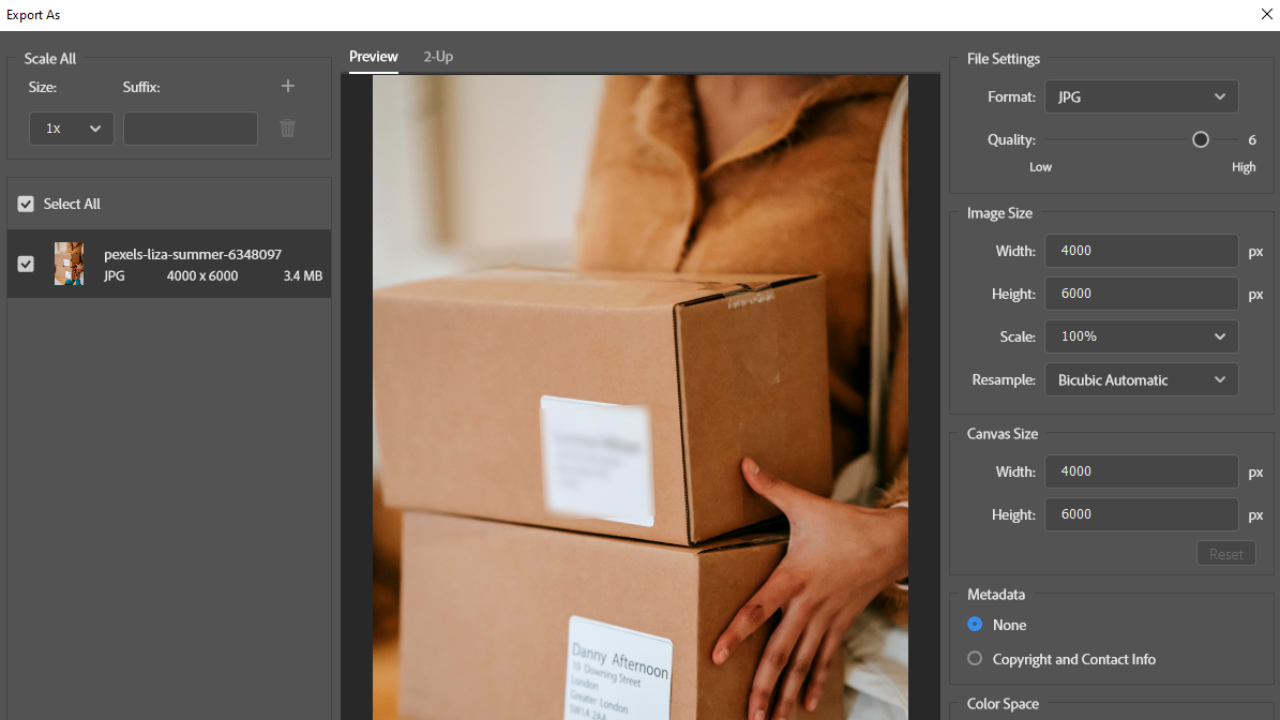
- Are you ready to export? Go to File > Export > Export As.
- Specify the settings. For instance, you can change the image size or pick the necessary image quality. Then click “Export” again.
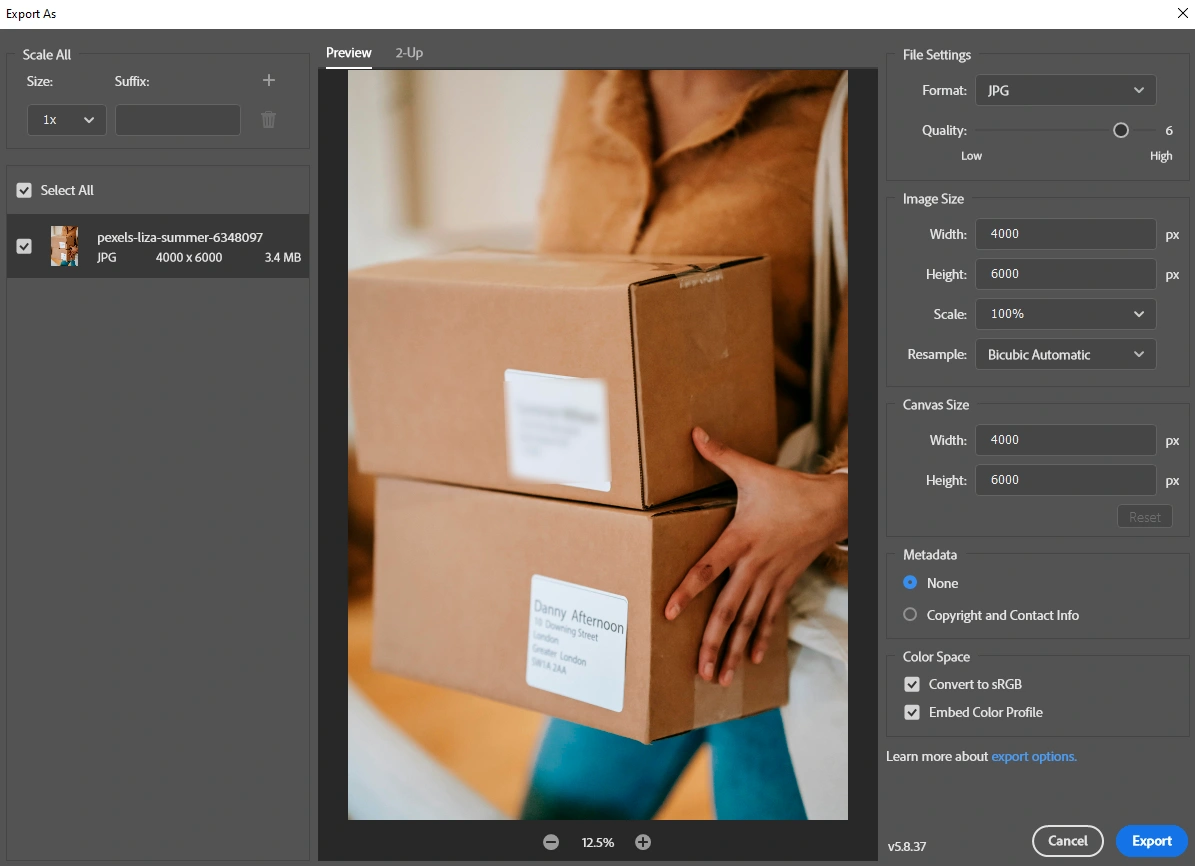
As you can see, now the blurred area is intense enough for the text to be unreadable. But there’s also a drawback. When using this method, the blurred area has a sharp edge which doesn’t look particularly professional and can be somewhat distracting. Another downside of this method is that if you need to blur several objects in an image, you will need to go through this whole process with each object separately. In other words, create a selection for the first object, blur it. Then create another selection for the second object, then blur it and so on. It can be quite time-consuming.
How to Blur a Part of an Image in Photoshop with Layer Mask and Brush Tool
You’re probably wondering now if there’s a way to add a blur with a soft edge in Photoshop, right? Well, there’s! If you want a seamless and smooth transition, this is what you need to do:
- Import your image into Photoshop, then create a copy of the Background layer by pressing CTRL + J on Windows or COMMAND + J on Mac.
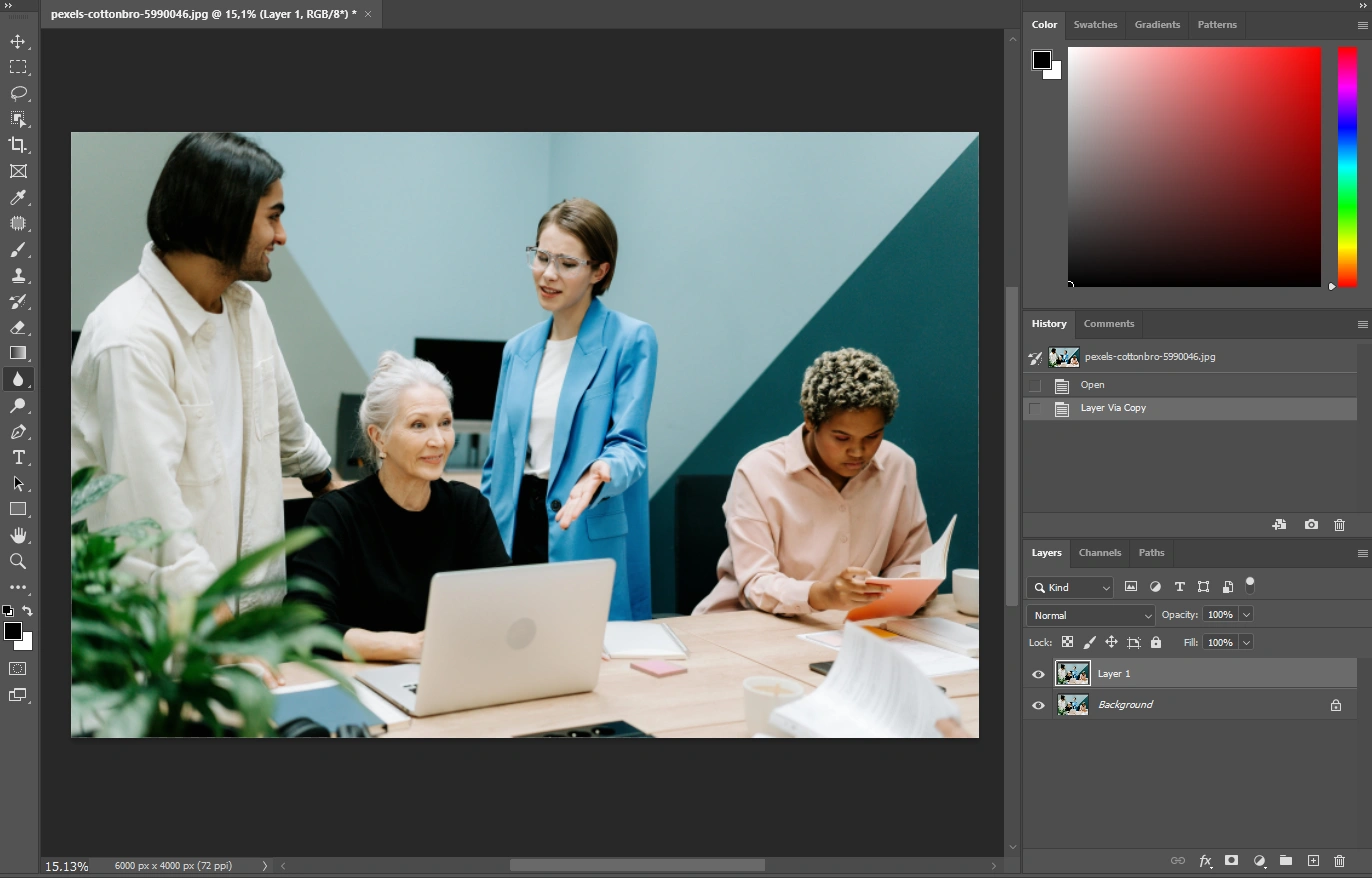
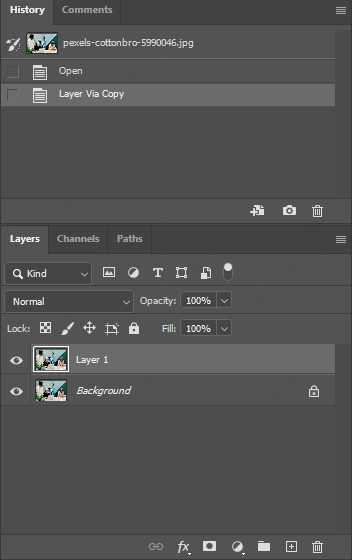
- Select the duplicated layer in the Layers Panel.
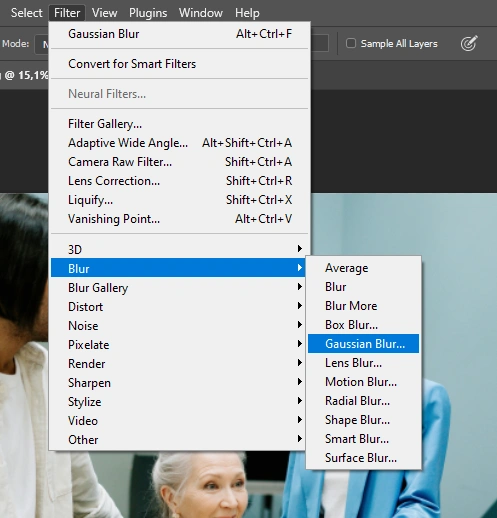
- Navigate to Filter > Blur > Gaussian Blur.
- Toggle the slider or enter the desired number of pixels to make the blur more intense. Once you hit “OK”, the entire image will be blurred. Don’t worry, this is how it should be.
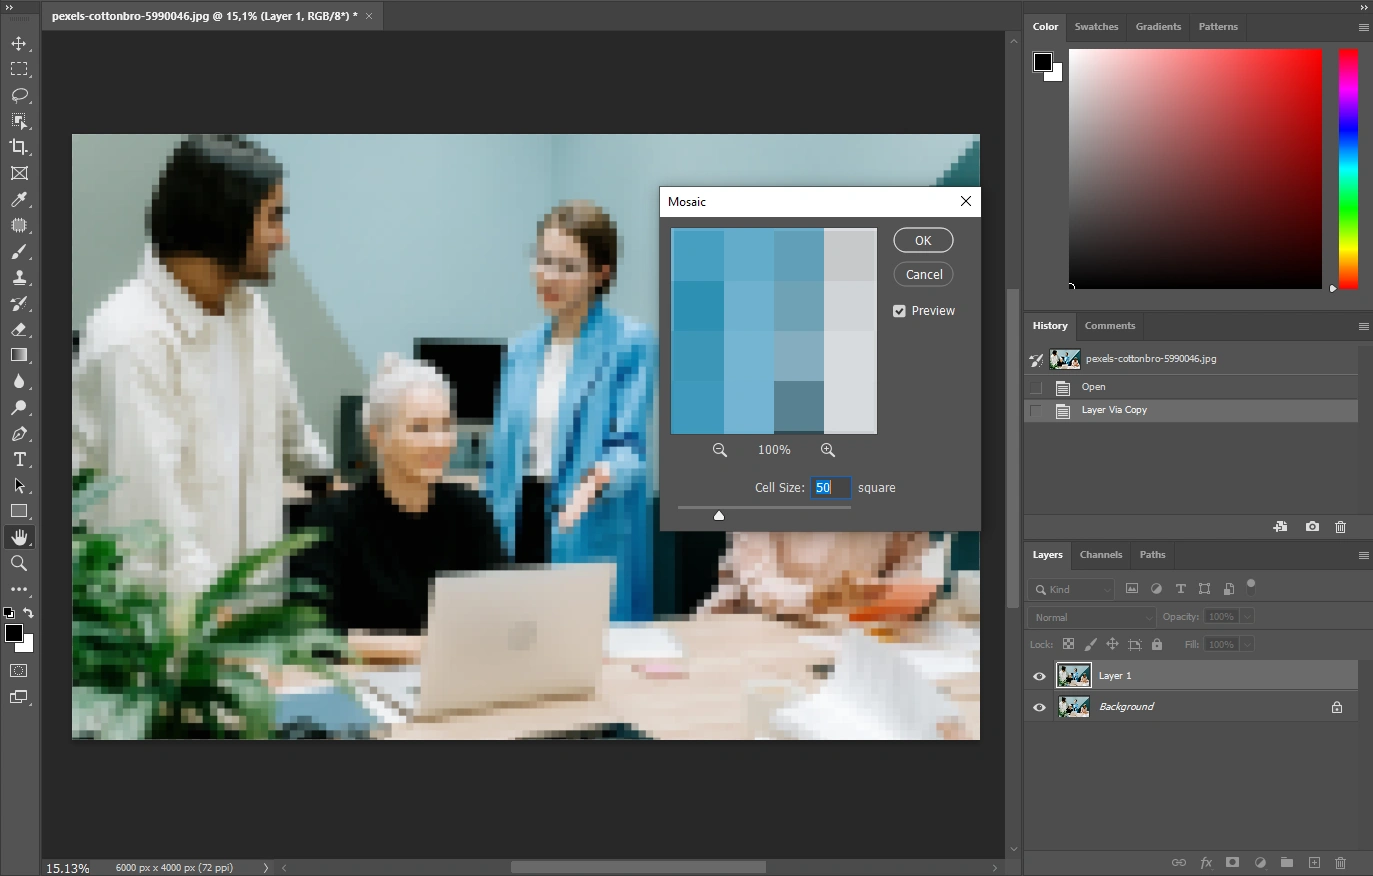
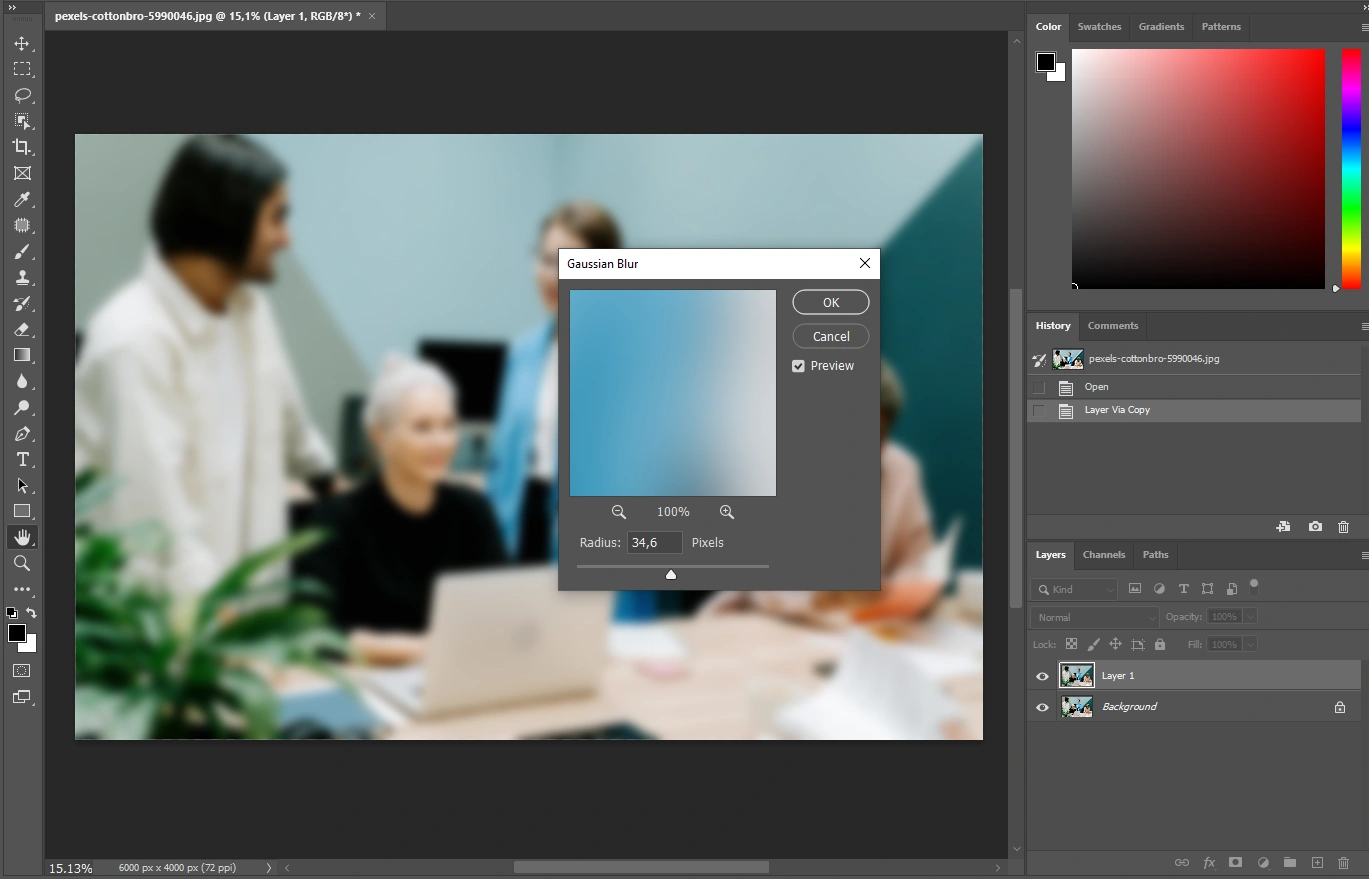 Here’s a tip. You can experiment a bit, if you want. Go for a different kind of blur – motion blur, for instance. Alternatively, you can pixelate an object instead of blurring it. In the Filter menu, instead of choosing the Blur section, go to Pixelate > Mosaic. Adjust the Cell Size, then click “OK”. Your image will be pixelated.
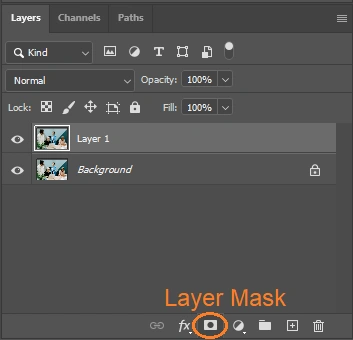
- Click on the “Add Layer Mask” icon at the bottom of the Layer Panel, while holding ALT on Windows or OPTION on Mac. It’s VITAL for you to hold ALT / OPTION. If you simply click on “Add Layer Mask”, the blurred layer won’t be hidden behind the mask.
Once you do this, your image won’t be blurred anymore.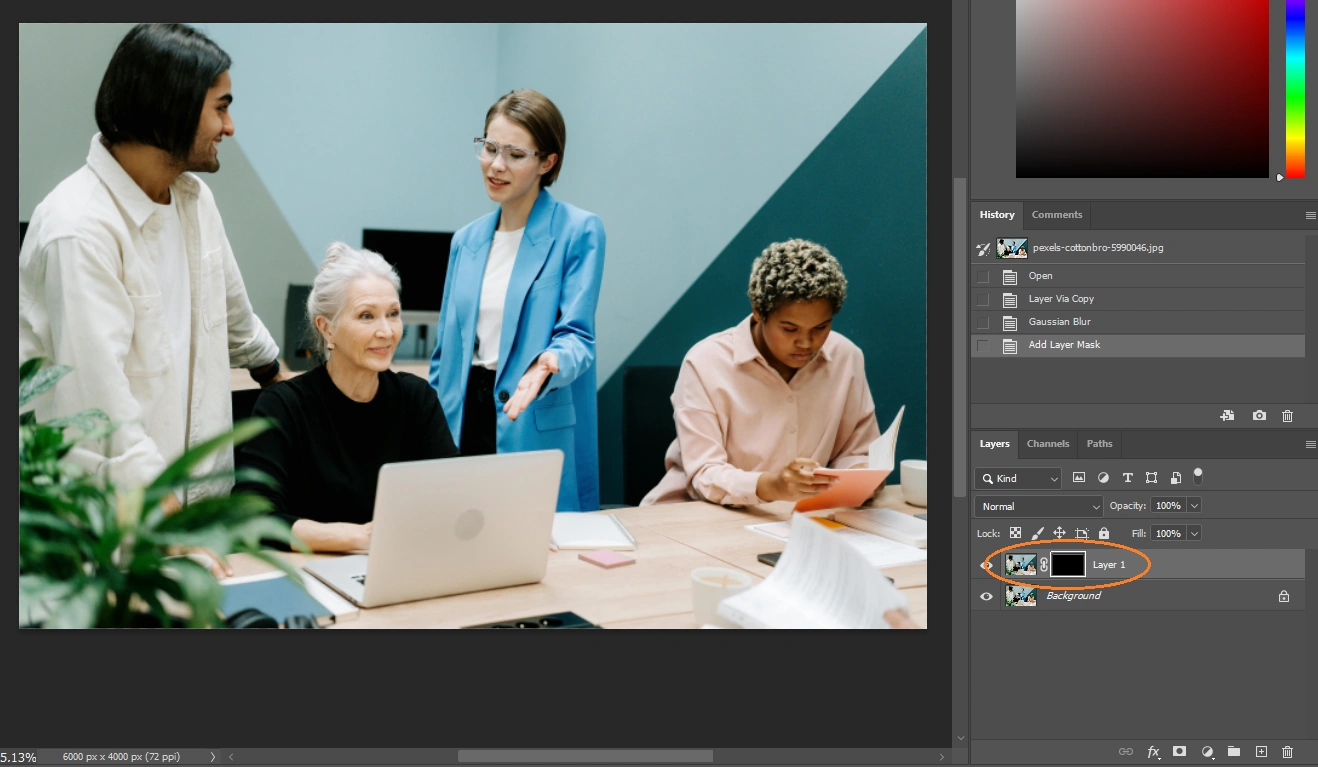
- Choose the Brush Tool in the Toolbar. Now, you need to be aware of two things. First of all, make sure that the foreground color is set to white, and it’s on top of the black color. Don’t use any other colors. This is important because the layer mask is black, and you will reveal the blur by painting in white.
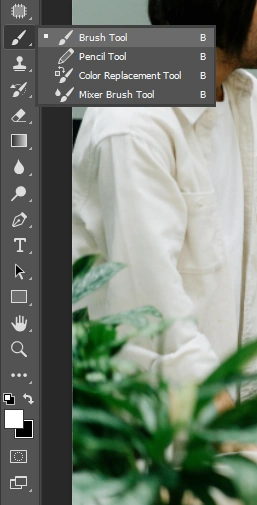
Second, the hardness of the brush should be no more than 10% in the Options menu. In fact, 0% would be perfect. This is the key to getting that soft and smooth transition.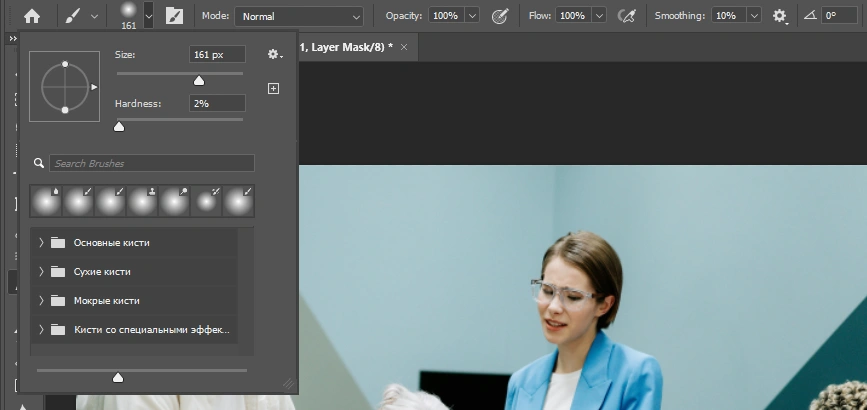
- Select the black rectangle in the Layers Panel, then paint over the part of an image that needs to be blurred.
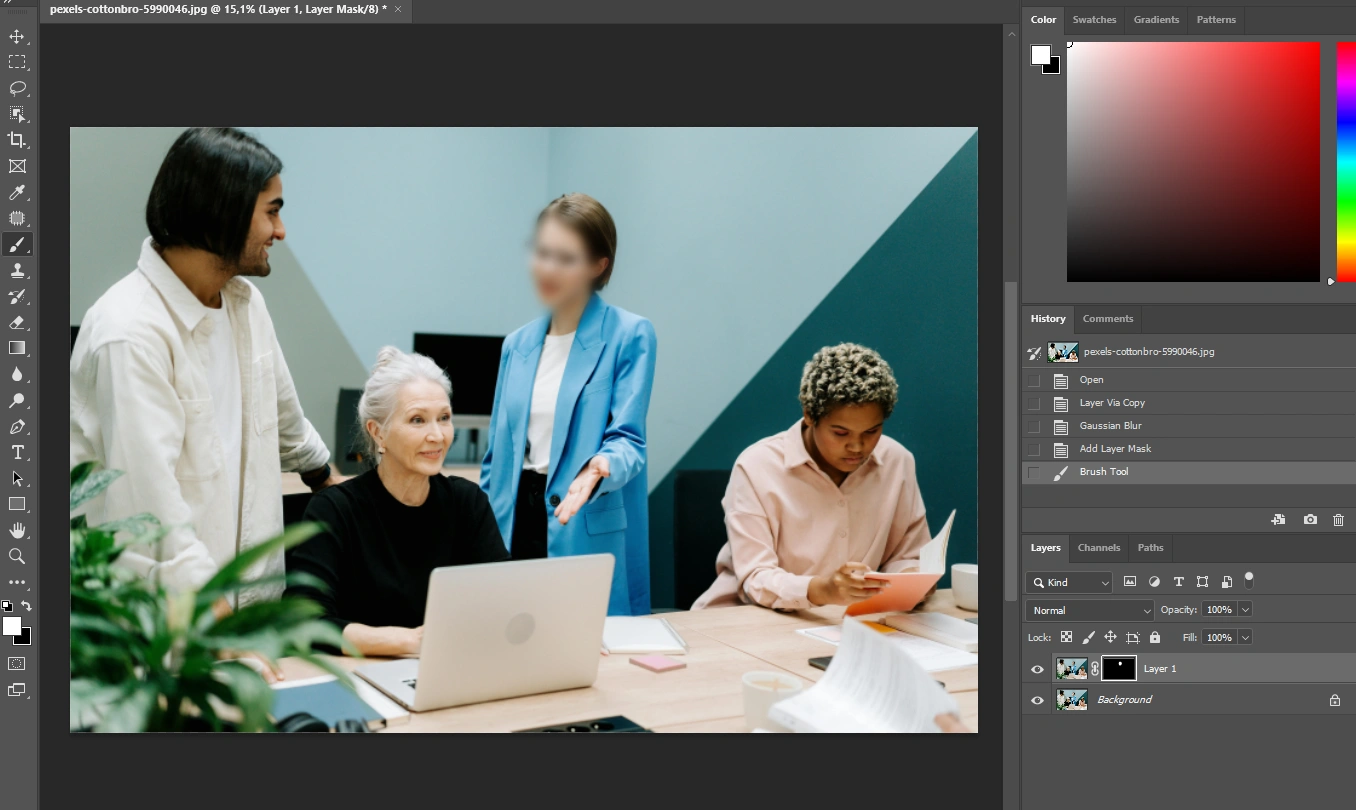
- Here, you can experiment with the opacity of the brush as well as with how many times you’ll paint over the same area. For example, the face of the woman in the blue jacket was painted over three times and the opacity was set to 98%. The other lady’s face was painted over two times and the opacity was set to 54%.
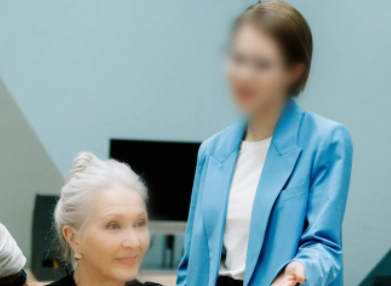
- All done! Now, you can move on to exporting.
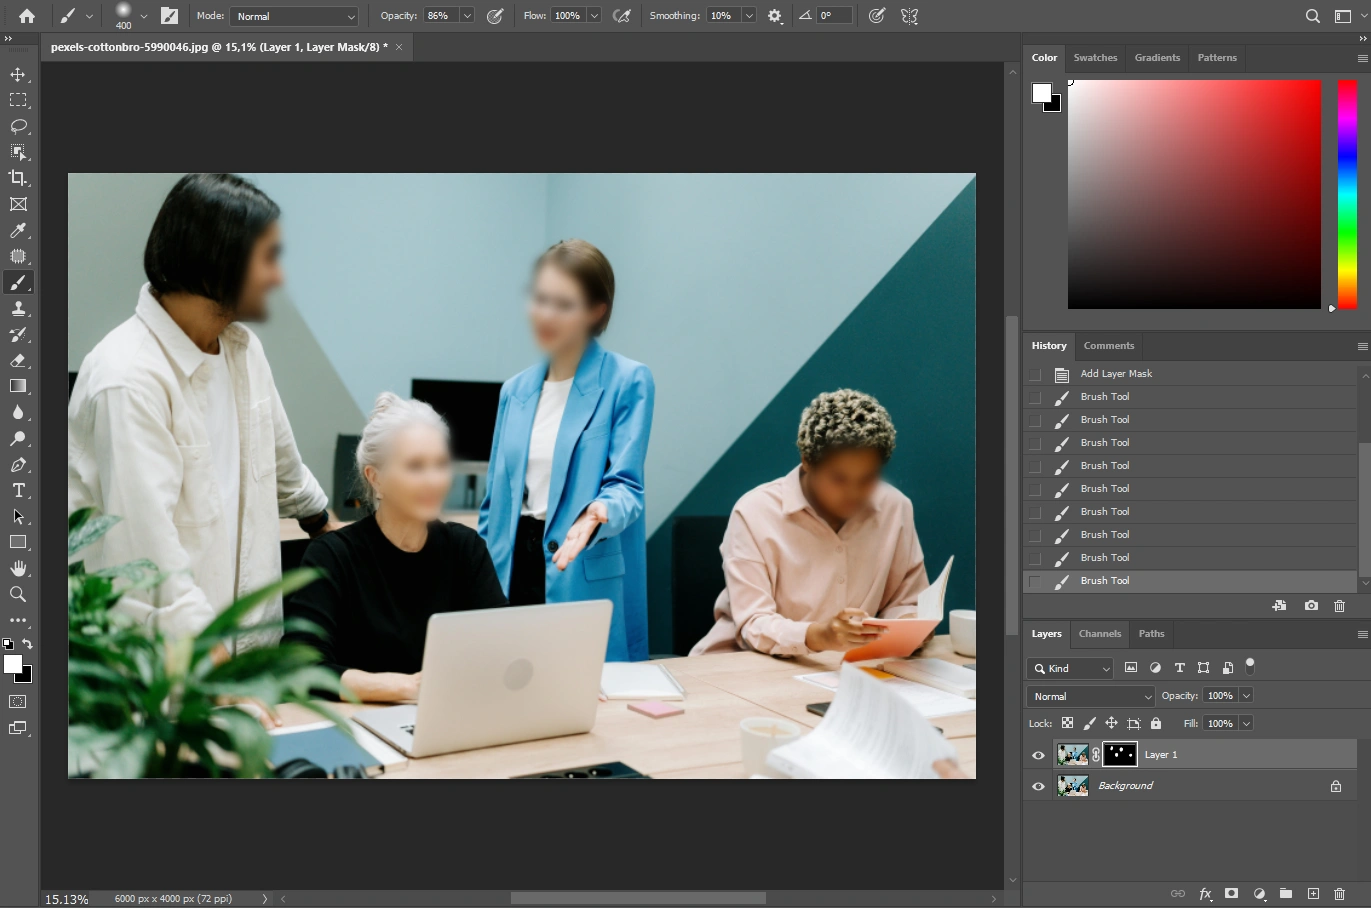
This method offers much more flexibility and room for experimentation, doesn’t it? This is how you can blur several objects in a single image in Photoshop quickly, and the blurred areas will have soft edges. No need to create multiple selections for each object. No distracting sharp edge. But this method also has a small drawback: creating a rectangular blur would be a challenge.
An Easier and Quicker Way to Blur a Part of an Image
Photoshop is one of the most versatile and powerful image editing software in the world. There’s no doubt about that. Its selection of tools and features is truly astounding. There are lots of things that you can do in Photoshop (for instance, crop image, watermark photos etc.). But…blurring a part of an image is a pretty simple task, yet you have to use different tools and take several steps to perform it. In other words, Photoshop is so advanced and complicated that performing simple tasks isn’t as simple and straightforward as it could be.
Fortunately, if you want an easier way to blur multiple objects in images, it does exist! You can do this in Visual Watermark, free watermark app.
It’s worth noting something right away. Visual Watermark is not a total substitute for Photoshop because all the online tools on Visual Watermark’s website are designed for simple image editing. Here, you can crop and resize images, convert them from one format to another, add some text to photo or watermark images with a logo and, as you might’ve guessed, blur license plates, faces and other objects. But you won’t be able to do more complex retouching. You won’t even be able to change exposure or colors in your images. Photoshop is significantly more advanced than Visual Watermark. What’s great about Visual Watermark, though, is that it’s perfect for basic image editing. You won’t have to add any layer masks or create selections.
Yes, Visual Watermark’s blur tool offers less flexibility than Photoshop. You won’t be able to select between different kinds of blur or pixelate an object. It’s not possible to adjust how soft the edge of the blurred area will be, either. But Visual Watermark’s blur tool produces blurred areas with soft edges automatically, which can be an advantage for you. It’s more beginner-friendly and does offer some editing options. Here, you will be able to adjust the intensity of the blur. Although, please, keep in mind that there’s no way of setting the intensity of each blurred area separately.
You will be able to reposition and resize your blurred areas with the cursor. Plus, it’s possible to tilt the blurred area by clicking on the blue arrows under the blur and moving the cursor to the left or to the right. Additionally, you can easily switch between the rectangular and the oval shape.
In Photoshop if you use the Marquee tool and decide to switch from rectangle to a circle after you’ve drawn the selection, you’ll need to start over. In Visual Watermark you can switch from oval to rectangle at any point of editing.
Visual Watermark has two more advantages over Photoshop.
First of all, if you want to blur faces or license plates, our blur tool will utilize AI algorithms to detect them automatically.
This might save you a significant amount of time. You can deselect faces and license plates that you don’t want to blur in the Objects menu. Please note that if you need to blur any other object, you will need to add a blur to each object manually.

The second advantage is that our blur tool supports batch processing.
It is possible to blur objects in multiple images in Photoshop, but for that you will need to create an action, then do the batch-processing, which can be a bit daunting and complicated for beginners. Not to mention that it will take you some extra time. Batch-processing in Visual watermark is super easy. You open the Blur Tool and upload all the images you want. Add blurred areas to all the objects you need. Finally, specify the export settings, wait for the processing to finish, then download your modified copies. And that’s it!
Visual Watermark’s blur tool works online in a browser.
You won’t have to install it, which means it won’t take up any space in your computer’s memory…or on any other device. Because you can actually use this blur tool on any device that has a browser and connection to the internet. Whereas you’ll be able to blur a part of an image in Photoshop only on a PC or maybe on a laptop if it’s powerful enough.
Frankly speaking, there’s no need to choose between Visual Watermark and Photoshop. You can use both of them. You can do all the complex image editing and retouching in Photoshop, then perform simple tasks in Visual Watermark to save your time and efforts.
Conclusion
Even if you are new to image editing, you will still be able to blur a part of an image in Photoshop. This can be done in three simple ways. Only the results will differ slightly. And if you want a way that’s easier and quicker, you can use Visual Watermark’s blur tool. It can automatically detect and blur faces and license plates. The blurred areas will have soft edges, so they will blend into your images organically and seamlessly. With the help of Visual Watermark you will be able to conceal any information, make any objects unrecognizable in multiple images within just a few clicks!
Learn More
How To Add a Watermark in Photoshop
 Visual Watermark
 by
by 