This tutorial is for Adobe Photoshop Elements. If you own Adobe Photoshop, here is a tutorial for you.
Whether you are a photographer, web designer or blogger, you’ve most probably had to deal with the headache of protecting your digital photos copyright. It’s easy enough to watermark, let’s say, ten or twenty pictures. But what if you have to process 10K pictures?
Batch image processing can make this process extremely faster and nearly painless. In this article, you’ll learn how to add the watermark to multiple photos in a batch using Adobe Photoshop Elements 11.
Get Started Watermarking
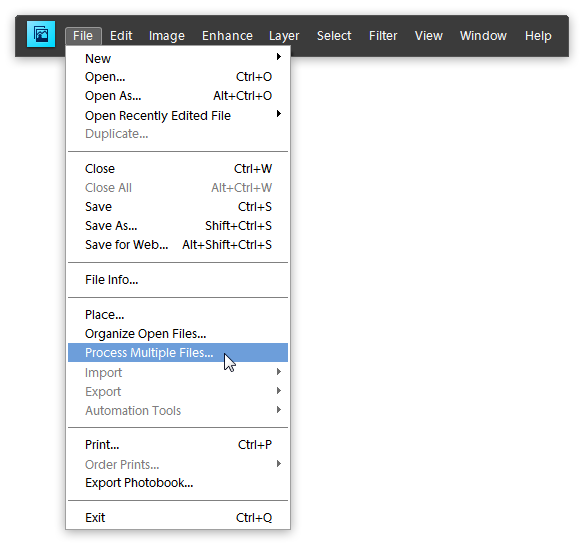
Run Adobe Photoshop Elements 11. Go to the File menu and select ‘Process Multiple Files…’ as shown in the screenshot below:

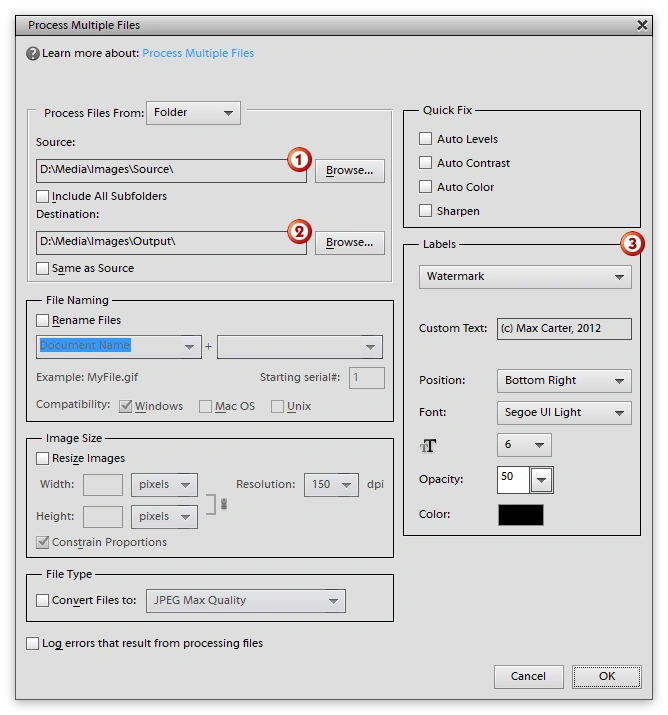
This invokes the ‘Process Multiple Files’ dialog:

In this tutorial, let’s do the following:
- Specify the Source folder which contains images you want to watermark. Note all your images should be contained in the same folder (or device).
- Specify the Destination folder to which watermarked images will be copied.
- In the Labes group, select ‘Watermark’, type the text and customize its settings (position, opacity and font settings).
You can also use additional options to rename watermarked images, perform image enhancements (use Auto Levels, Auto Contrast, Auto Color and Sharpen options), specify the size, quality and output file type.
- And you are done. Click OK to run the batch watermarking.

Limitations
The batch engine in Adobe Photoshop Elements 11 doesn’t allow you to use images or vector graphics as watermarks.
Want to use images as watermarks?
Performance Measurements
Finally, let’s measure how much time it takes Abode Photoshop Elements 11 to embed a custom string in multiple images. The results are shown in the table below:
Results
Total Files: 442
File Size, Mb: 5.2
Total Processing Time, min: 10:26
Hardware
Processor: Intel Core i7-2630QM CPU 2.00GHz 2.00GHz
RAM: 8.00 GB
System type: 64-bit Operating System
If you want to watermark 10K photos during the same time, try our watermark maker.
 Visual Watermark
 by
by 